Shell Rot also known as ulcerative shell disease can particularly affect red-eared sliders, which are a type of aquatic species prone to this condition due to their habitat requirements. These turtles may develop symptoms of shell rot if kept in dirty water or a dirty environment.
It’s a common yet serious condition that can easily be prevented with proper husbandry.
Notwithstanding, the misconceptions about it are numerous and persistent. Perhaps most concerning, there is a widespread myth that shell rot only affects aquatic turtles.
Table of Contents
Let me disabuse of this one first – shell rot is common in tortoise genera around the world, including Testudo, Chelonoidis, Centrochelys and Stigmochelys, whose species we commonly keep as pets.
Another misconception is that shell rot is only caused by bacteria. Again, let’s not be drawn in by folklore! Although scientific evidence suggests that most cases are caused by bacteria, a significant percentage are instead caused by fungi, indicating that fungal infection plays a critical role in the development of turtle shell rot, particularly in humid environments where fungi thrive.
The initial infection can stem from poor hygiene, lack of a dry area, or an injury, and is notably prevalent among wild turtles and pet turtles that encounter sharp objects or sharp edges in their enclosure, leading to shell damage and subsequent infection. Meaning errors in husbandry can allow shell rot to take hold in previously healthy animals.
Bearing this in mind, it’s important to get an understanding of the condition so it can be dealt with correctly.
In this article, we’re going look at the healing process of shell rot, the best way to address the symptoms of shell rot, and preventative measures to protect your turtles, including box turtles and baby turtles, from this very serious condition.
How To Prevent & Treat Shell Rot
1. What does shell rot look like?

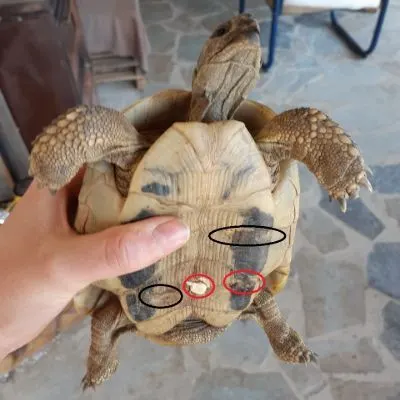
In aquatic turtles, shell rot commonly appears as whitish or grey spots, which may indicate the beginning stages of a bacterial infection or a fungal infection within the blood vessels beneath the shell plates. Over several months, the lesions spread outwards across the shell and inwards towards the underlying bone, leading to raised, flaking scutes and mushy areas.
Another sign of shell rot in aquatic turtles is an unusual dent, hole or pitting that appears on an otherwise smooth patch of shell. Occasionally, it appears as angry red or orange ulcers that spread quickly.
This type of shell rot is less common, but on the one occasion where I have seen it, Staphylococcus bacteria were found to be the cause.
Algae can be a contributing factor in shell rot, but in adult Musk Turtles (Sternotherus spp.) algal growth on the shell is common and generally harmless.
In tortoises and terrestrial turtles, shell rot often starts on the plastron – a good reason to regularly lift your tortoise up (without turning him/her upside down) and have a look at shell condition.
Though it does take on a whitish or orange appearance, it can be obscured by dirt and go undetected for some time. Sometimes starting in the cracks between scutes before spreading outwards across them, it also presents as round lesions.
In some cases, it causes a thickening and flaking of the scutes, producing a puff pastry effect. This last detail is a tell-tale sign of an advanced infection.
In both aquatic turtles and terrestrial turtles and tortoises, shell rot eventually causes deep ulcers and soft, rotten depressions in the shell, making it unmistakable.
Sometimes, whole scutes fall off, which can be distressing to see. Before this point, smell can be good clue that the disease is present.
A smell of mouldy old gym socks or stagnant water can be quite strong when the lesions are gently roughed up with a scraper.
2. Does my turtle have shell rot, or is it shedding?


It is a good idea to check for small pits or white spots, as these can be the following symptoms of an early stage shell rot infection, often exacerbated by poor water quality or a bacterial growth on the surface of the shell.
Scute shedding is a natural occurrence for most species of aquatic turtle, and while this is a normal part of their growth process, pet owners should be vigilant as shell conditions like wet shell rot or dry shell rot can mimic natural shedding. It’s being observed frequently in juveniles and annually or biannually in adults.
That said, it can be hard to tell the difference between healthy shedding, called ecdysis, and unhealthy shedding, called dysecdysis (think dysfunctional).
Ecdysis occurs because the outer layers of turtle scutes are made of keratin, which needs to be replaced as the turtle grows. However, when the shedding is accompanied by a foul odor or the shell has a slimy layer, it may indicate an infected turtle suffering from shell rot.
Dysecdysis occurs when an animal is sick, overfed, injured, or exposed to a basking light that is too hot.
Sick turtles may exhibit abnormal shedding due to an underlying bacterial infection or septicemic cutaneous ulcerative disease, a condition that can cause rapid deterioration in the health of the affected turtle.
3. How can I tell between ecdysis and dysecdysis?
1. Tortoises and terrestrial turtles do not shed scutes unless shell rot or an injury is present.
2. Softshell turtles never shed scutes (they don’t have any!).
3. Diamondback Terrapins only shed scutes once they get to approximately 5-6 inches (12.5 – 15 cm) in carapace length (measured by placing a ruler on the midline of the carapace and viewing it from above).
4. Healthy scute shedding is one layer at a time, separated by weeks or months – not a continuous process.
5. Layers that come off during healthy shedding are paper thin and sometimes see through.
6. Healthy shedding means all the carapace and plastron at the same time – not just one scute.
7. During healthy shedding, scutes come off whole.
8. Scutes that are shedding often get air trapped under them and look reflective when underwater.
9. White bone is never exposed after healthy shedding.
Ecdysis is a good sign – it allows the shell to grow and makes it look brand new. The process can take 5-6 weeks for an adult, or considerably less time for a juvenile.
A dry basking spot and unfiltered UVB light aid the process, with many keepers noticing that turtles kept outdoors in warm climates shed more quickly.
Some turtle specialists recommend supplementing with Koi pellets containing wheat germ during shedding (around once a week), as they are high in Vitamin E which promotes skin and shell health.
Dysecdysis can be a sign of shell rot if other causes have been ruled out.
4. How to treat shell rot and when to see a vet
Ensuring clean water and a healthy living space is crucial, as turtles living in fresh water with appropriate water temperature are less likely to develop shell infections. Additionally, using a mild soap for cleaning and avoiding any sharp edges in the turtle’s enclosure can prevent unnecessary shell damage.
How to treat shell rot varies depending on its severity. Let’s put it into two categories based on this: early stage and late stage/acute shell rot.
Early stage shell rot appears as white or discoloured patches, and/or slight dysecdysis. It can be managed at home if you carry out treatment daily and keep a photo log of progress.
Before starting, be sure to double check enclosure temperatures – reptiles never recover well if their temperatures are off!
4.1 For early stage shell rot in aquatic turtles follow these steps:
This is the first step in the healing process. After removing the turtle from water, dry the affected area with paper towels to ensure no wet areas remain that could harbor bacterial growth.
- Scrub the area gently with a toothbrush and lukewarm water to remove any dirt. Let the shell dry.
- Apply either povidone-iodine or silver sulfadiazine ointment to the affected area. Let dry for an hour before returning the turtle to its enclosure.
- Repeat daily for three weeks.
- Change out the water regularly and change your pump filter at the start of treatment, as this is among the best ways to prevent the spread of the infection into the body cavity through the blood stream.
Remember, aquatic turtles need a basking area that allows them to dry off completely. Turtle docks that sink when the turtle climbs on are no good! If your turtle cannot regularly get completely dry, then treatment will not work.
For early stage shell rot in tortoises follow the same steps, but also try to lower humidity in the enclosure. This will help slow microbial growth.
Improvement should be noticeable within two to three weeks. If not, consult a reptile vet as soon as possible.
Though many keepers recommend using hydrogen peroxide to treat shell rot, there are concerns that it slows healing in healthy tissue.
Using treatments like silver sulfadiazine cream or topical antibiotics can be effective against both fungal and bacterial infections, aiding the healing process.
My advice would be to stick to the two antiseptics I mention above in the steps.
4.2 Late stage/acute shell rot
Late stage/acute shell rot is characterised by dents, mushy white or red areas and/or severe dysecdysis. At this stage, the condition is much more serious and will need to be managed by a reptile vet. Pain management and systemic treatments are usually necessary.
If you take a turtle or tortoise with acute shell rot to a reptile vet, they will start by assessing the animal and possibly administering pain medication.
After this, they may decide that debridement of some infected areas is necessary under anaesthesia. Debridement, the surgical removal of dead tissue, can dramatically improve the results of treatment.
At the same time, a tissue sample for microbial culture may be taken which will determine what pathogen is involved. If bacteria are involved, then the results of the culture will be definitive within a few days.
Do not be surprised if your vet begins treatment with antifungal or antibacterial medication before the results of the culture are back, or without taking a sample. In severe cases it is better to get a head start using broad-spectrum medication.
5. Treatment works, but prevention is better!
The treatments described above are usually successful, but it is essential that you determine why your pet got shell rot in the first place!
If an injury was involved, such as one caused by sharp objects within the turtle’s enclosure, it is imperative to remove any such hazards to promote the healing of the entire shell. This should tell you that your animal’s enclosure is not safe enough, and probably not hygienic enough either.
Tortoise shell rot often starts from dirty or damp substrate because their plastrons are constantly in contact with it. It is important to maintain the hygiene of a tortoise enclosure by quickly removing old food or faeces and replacing substrate regularly.
Particular attention is advised if you hibernate your tortoise because their immune system does not function efficiently during this time.
Personally, I do not recommend hibernating tortoises outdoors, as a controlled setting in your garage is safer and more hygienic.
In aquatic turtles, shell rot is commonly caused by poor water hygiene.
Keeping a tank full of water clean – with an animal eating and defecating in it – can be a challenge!
Once you start looking into it, however, there is an incredible range of products made for precisely this purpose.
Water filters with built-in UV sterilisers, for example, can dramatically improve water hygiene.
6. Soft Shell Spots
Whenever you see (or feel) a soft spot on your turtle’s shell it’s important to assess the situation and decide whether you think it is normal or not. After all, some soft spots can be a sign of advanced Shell Rot and will require veterinary treatment.
Though generally a sign of disease, soft shell spots can occasionally be normal. The key to understanding whether they are a problem is deciding if they are just anatomical features or indeed something different.
This can be a little harder than it sounds if you are new to turtles, but we’re going to look at some tips to help you. Let’s take a look at the three main kinds of soft shell spots so that you know what to look for.
6.1 Normal anatomical soft spots
These aren’t really “spots,” more like soft areas, or generally flexibility. As the label implies, these soft areas are a normal part of growth and anatomy.
For example, in young turtles and tortoises under a year old, there may be areas of the shell that feel slightly soft or flexible. This varies from species to species, but as a general rule they are found along the sides of the carapace (where the ribs would be), above the tail, and at the centre of the plastron.
There are two important things to remember with these soft spots. First is that they are not visible. They cannot be seen, only felt by touch. Second is that they disappear completely with growth: somewhere between 6 to 12 months in age your pet’s shell should harden completely.
6.2 Soft Spots from Metabolic Bone Disease
In animals over 1 year in age, soft spots are not normal and can be a sign of Metabolic Bone Disease (MBD). This condition is most often caused by a deficiency in Vitamin D caused by a lack of UV light. When this deficiency is present it stops the animal from being able to metabolise and use calcium, leading to soft bones and shell.
The easiest way to treat and prevent it is to provide your pet with either natural sunlight or a high quality UVB bulb, preferably one that also emits UVA. This should be provided on a regular day/night cycle, and on top of a balanced diet.
Your main clue that MBD is present is that your turtles whole shell will get progressively softer. If no improvement is seen with UVB light and a balanced diet, then veterinary assistance is vital.
6.3 Soft Spots from Shell Rot
Soft spots from Shell Rot are almost always mushy, round, and localised. The top of the lesion will have grey or white material on it. Their appearance contrasts with the surrounding shell with regards to both colour and texture.
If you see spots that don’t just feel soft, but look odd too, you need to contact a vet. This is a sign of advanced Shell Rot and needs immediate treatment.
Wrapping up
As aggressive treatment is necessary for severe shell rot cases, preventative measures like maintaining a dry shell under a heat lamp, ensuring a hygienic turtle enclosure with UV lamp sterilization, and using healing cream on damaged areas can all contribute to the health of your turtle.
Using this article, you should be able to determine if your animal has shell rot, what to do about it, and whether you need to consult a vet.
Fortunately, shell rot is highly treatable and can usually be cured in a matter of weeks. More to the point, if you put in the time and do the research, you can prevent it from coming back.
If your animal has suffered with shell rot, make sure it gets the treatment it needs, then use this website to review your husbandry and banish the disease for good!